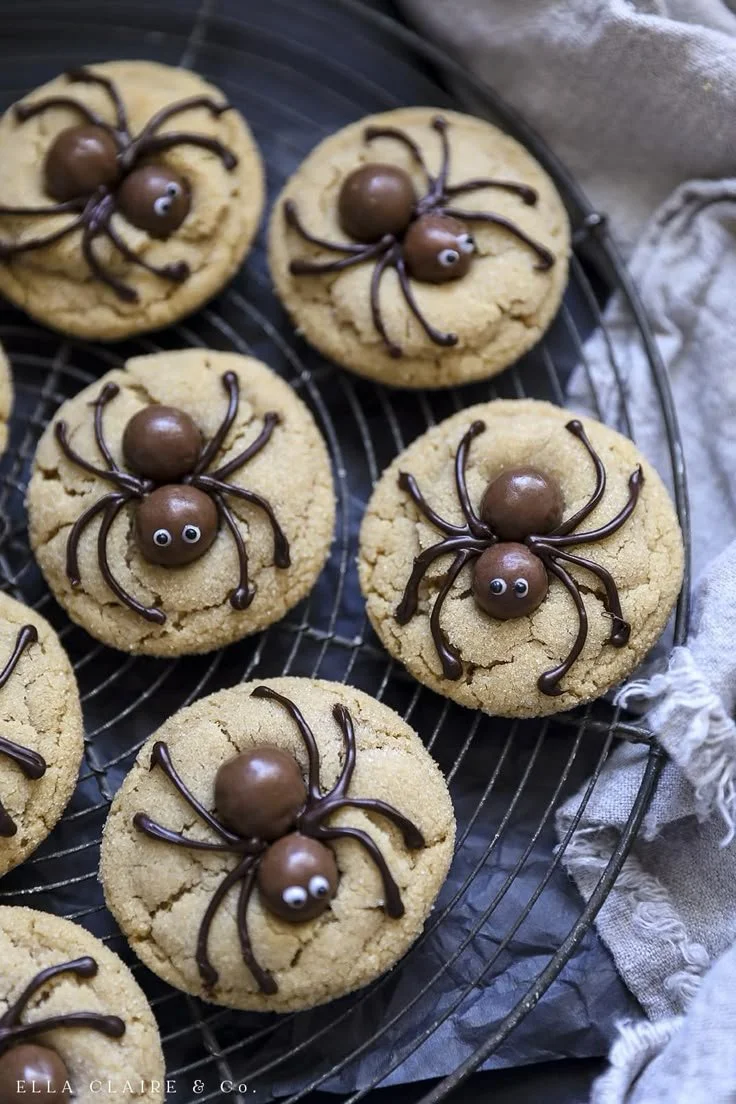
The delightful Halloween Peanut Butter Cookies capture the spirit of the season with their fun and spooky appearance. These spider cookies not only look festive but also offer a harmonious blend of nutty sweetness and chocolatey decadence. Perfect for family gatherings or classroom treats, this recipe brings together ease and creativity for both seasoned bakers and beginners alike.
Why You’ll Love Halloween Peanut Butter Cookies
- Fun Presentation: The spider design makes these cookies a hit at Halloween parties, instantly appealing to kids and adults alike.
- Easy to Make: With straightforward ingredients and simple steps, this recipe is suitable for bakers of all skill levels.
- Delicious Flavor: The classic combination of peanut butter and chocolate creates a delightful treat that satisfies cravings.
- Customizable: You can add various toppings or mix-ins to tailor these cookies to your taste.
- Make-Ahead Friendly: These cookies are great for meal prep, helping you get a head start on holiday baking.
Recipe Overview
- Prep Time: 15 minutes
- Cook Time: 10 to 12 minutes
- Total Time: 25 to 30 minutes
- Servings: 24 cookies
- Difficulty Level: Easy
Ingredients You’ll Need for Halloween Peanut Butter Cookies
-
For the Cookies:
- 1 cup peanut butter (smooth or crunchy, your choice)
- 1 cup granulated sugar
- 1 large egg
- 1 teaspoon vanilla extract
- 1 teaspoon baking soda
- A pinch of salt
-
For the Decoration:
- 1 cup semisweet chocolate chips (for spider bodies)
- Additional candy eyes (for spider decoration)
(Always add 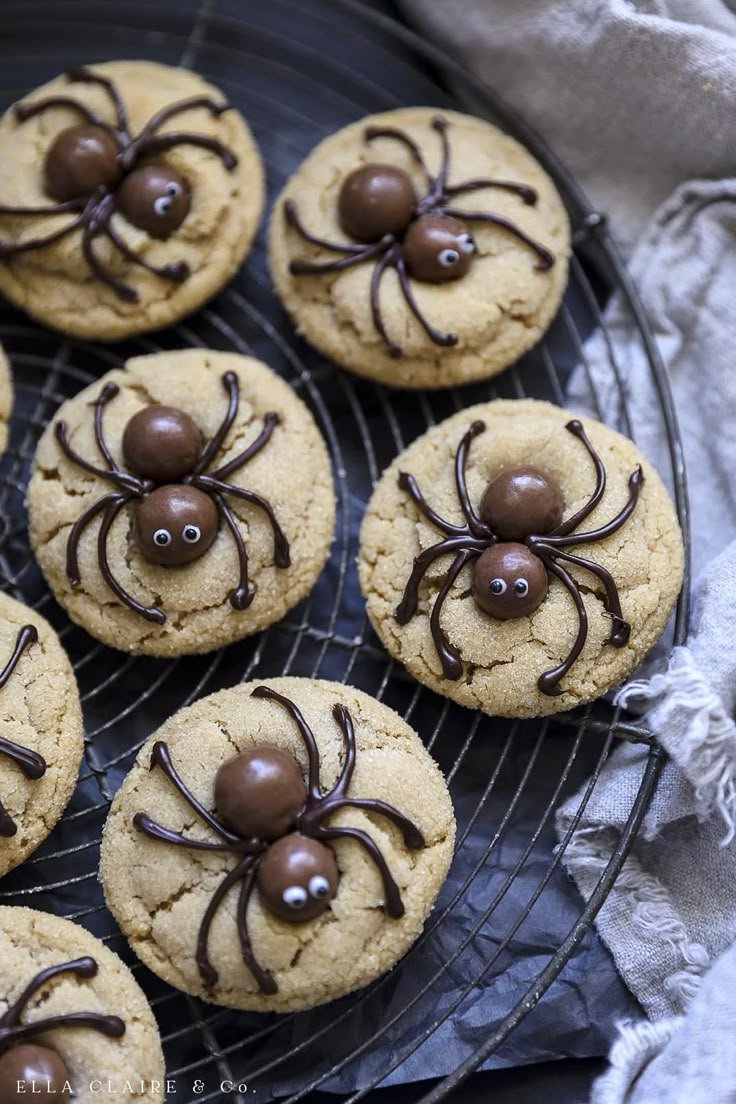
here)
How to Make Halloween Peanut Butter Cookies
-
Preheat the Oven: Preheat your oven to 350°F (175°C) and line a baking sheet with parchment paper. This helps the cookies bake evenly and prevents sticking.
-
Mix Wet Ingredients: In a large mixing bowl, combine the peanut butter, sugar, egg, vanilla extract, and salt. Use a hand mixer or a whisk to blend until the mixture is smooth and creamy.
-
Add Dry Ingredients: Gradually mix in the baking soda until incorporated. The dough will be slightly sticky but manageable.
-
Form the Cookies: Using a small cookie scoop or your hands, form tablespoon-sized balls of dough and place them on the prepared baking sheet, spacing them about 2 inches apart.
-
Create the Spider Design: Gently flatten each dough ball with a fork, creating a crisscross pattern. Bake in the preheated oven for 10 to 12 minutes, or until the edges are just golden.
-
Add Chocolate: Remove the cookies from the oven and immediately press a few chocolate chips into the center of each cookie for the spider’s body. Let them cool on the baking sheet for a few minutes before transferring to a wire rack.
-
Decorate: Once the cookies have cooled completely, melt additional chocolate chips in a microwave-safe bowl in 30-second increments, stirring until smooth. Dip the end of a toothpick into the chocolate and use it to draw spider legs around the body on each cookie, and stick on candy eyes to finish the look.
Tips for Success
- Chill the Dough: If the dough is too sticky, refrigerate it for about 30 minutes before baking. This will make it easier to handle.
- Don’t Overbake: Keep an eye on the cookies while baking; they should be just set. They’ll firm up as they cool.
- Taste Test: Always bake a small test batch first to ensure the texture and flavor meet your preference.
- Be Mindful of Allergy: If serving to a crowd, be aware of common allergens, especially peanut butter. Consider offering non-peanut alternatives.
Easy Variations
- Nut-Free Option: Substitute peanut butter with sun butter for a nut-free version.
- Chocolate Swirls: Mix in a handful of chocolate chips into the dough for a richer cookie.
- Spicy Twist: Add a pinch of cinnamon or chili powder for a hint of warmth.
- Colorful Spiders: Use colored candy melts instead of chocolate for a more festive look.
What to Serve with Halloween Peanut Butter Cookies
- Milk: A classic pairing that complements the rich peanut butter flavor.
- Dark Chocolate Dipped Fruit: Offers a fresh contrast and keeps the dessert feel.
- Halloween-Themed Milkshakes: Fun, festive drinks that align with the spooky theme.
- Caramel Sauce: A drizzly addition that enhances sweetness and adds a chewy texture.
Storage and Reheating
- Refrigerator Storage: Keep the cookies in an airtight container for up to a week.
- Freezer Storage: You can freeze unbaked dough balls. Place them on a baking sheet until firm, then transfer to a freezer bag. Bake straight from the freezer, adding a minute or two to the baking time.
- Best Reheating Method: For warm cookies, heat them in the microwave for about 10-15 seconds. Avoid reheating multiple times to preserve texture.
Common Mistakes to Avoid
- Using Cold Ingredients: Ensure your peanut butter is at room temperature for easier mixing.
- Ignoring Baking Times: Always check for doneness by looking for golden edges, rather than relying solely on time.
- Crowding the Baking Sheet: Leave enough space between the cookies for even baking and spreading.
Halloween Peanut Butter Cookies: Background & Cultural Inspiration
Peanut butter cookies are a classic American treat, often enjoyed throughout the year but take on a special appeal during the Halloween season. The tradition of decorating cookies goes back centuries, serving as a way to celebrate and engage with festive themes. As families gather to celebrate, making themed treats like these spider cookies can create lasting memories and inspire creativity, making baking a diverse and inclusive activity during Halloween festivities.
Frequently Asked Questions
Can I use natural peanut butter?
Yes! Just make sure it’s well stirred and not too runny.
How long will these cookies stay fresh?
Stored in an airtight container, these cookies can last about a week. For longer freshness, freeze them.
Can I make these cookies ahead of time?
Certainly! You can prepare the dough and freeze it for baking later or bake and store them in advance.
Are there vegan options for these cookies?
You can replace the egg with a flax egg (1 tablespoon ground flaxseed mixed with 2.5 tablespoons water) and use vegan chocolate chips to create a vegan version.
How can I adjust the sweetness?
If you prefer less sweetness, reduce the sugar slightly, or opt for a dark chocolate topping which is less sweet than semisweet chocolate.
Final Thoughts
Halloween Peanut Butter Cookies are not just a treat; they are a celebration of creativity in the kitchen. With their easy preparation and festive look, they are great for sharing with family and friends. Dive into the fun of decorating and enjoy the deliciousness that comes with these delightful cookies, making your Halloween celebrations a little sweeter.
PrintHalloween Peanut Butter Cookies
Delightful Halloween-themed peanut butter cookies with a fun spider design, perfect for festive gatherings.
- Prep Time: 15 minutes
- Cook Time: 12 minutes
- Total Time: 27 minutes
- Yield: 24 cookies
- Category: Dessert
- Method: Baking
- Cuisine: American
- Diet: Vegetarian
Ingredients
- 1 cup peanut butter (smooth or crunchy)
- 1 cup granulated sugar
- 1 large egg
- 1 teaspoon vanilla extract
- 1 teaspoon baking soda
- A pinch of salt
- 1 cup semisweet chocolate chips (for spider bodies)
- Additional candy eyes (for spider decoration)
Instructions
- Preheat your oven to 350°F (175°C) and line a baking sheet with parchment paper.
- Mix in a large mixing bowl the peanut butter, sugar, egg, vanilla extract, and salt until smooth.
- Add baking soda gradually until incorporated; the dough will be slightly sticky.
- Form tablespoon-sized balls of dough and place them about 2 inches apart on the baking sheet.
- Create a crisscross pattern by gently flattening each dough ball with a fork.
- Bake for 10 to 12 minutes, or until the edges are just golden.
- Add a few chocolate chips into the center of each cookie after removing them from the oven.
- Decorate by melting additional chocolate chips and using a toothpick to draw spider legs and attach candy eyes.
Notes
For easier handling, chill the dough if too sticky. Avoid overbaking for the best texture.