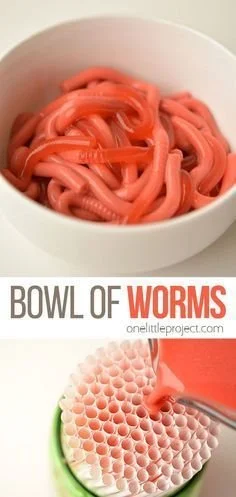
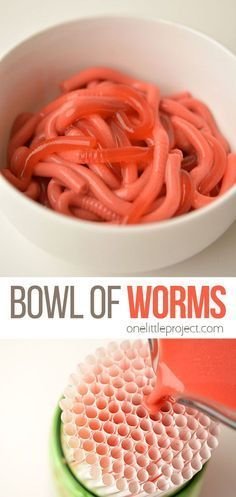
The fun of making a bowl of worms comes from creating a wiggly, delicious treat that’s sure to delight both kids and adults alike. This Jello Worms recipe is not only visually entertaining but also super easy to make. Perfect for parties, Halloween, or a whimsical dessert, this recipe will have everyone asking for seconds!
Why You’ll Love Jello Worms
- Simple Ingredients: You only need a handful of easily accessible ingredients, making this a budget-friendly dessert.
- Creative Presentation: The wiggly worms look incredible and are a hit with kids, making them perfect for themed parties.
- Customizable Flavors: Choose your favorite flavors of Jello to create unique combinations that suit everyone’s tastes.
- No Baking Required: This treat requires no baking, which means you won’t need to heat up the kitchen or worry about complicated techniques.
- Make Ahead: Jello Worms can be prepared in advance, freeing up time for other party preparations or family activities.
Recipe Overview
- Prep Time: 30 minutes
- Chill Time: 4 hours (or overnight)
- Total Time: 4 hours 30 minutes (or overnight)
- Servings: 4-6
- Difficulty Level: Easy
Ingredients You’ll Need for Jello Worms
- 1 package of Jello (any flavor): This will be the base for your worms. Choose a fun color for visual impact.
- 1 package of unflavored gelatin: This adds structure and helps the worms hold their shape.
- 2 cups of water: Needed to dissolve the gelatin mixture.
- Flexible straws (not paper): To create worm shapes; consider using thick straws for larger worms.
- Cooking spray (optional): This can help when removing worms from straws.
How to Make Jello Worms
- Prepare the Mixture: In a medium saucepan, bring 1 cup of water to a boil. Remove from heat and add the Jello and unflavored gelatin. Stir until fully dissolved.
- Add Cold Water: Add the remaining 1 cup of cold water to the mixture. Mix well.
- Fill the Straws: Using a funnel, carefully fill each straw with the Jello mixture. Hold the straws upright and fill them completely.
- Chill: Place the filled straws upright in a glass or cup, and refrigerate for at least 4 hours or until fully set.
- Remove the Worms: Once set, gently squeeze the straw from the bottom while pushing the Jello worm out from the top. Use a knife to help loosen if necessary.
- Display: Arrange the worms on a platter or inside a cup of dirt (crushed Oreos) for a fun presentation.
Tips for Success
- Use Thin Straws: Thinner straws create more realistic worm shapes. Look for silicone straws or those designed for smoothies.
- Avoid Bubbles: When mixing the gelatin, stir gently to prevent bubbles from forming; they can spoil the look of your final product.
- Chill Overnight: For best results, let the worms set overnight. This helps them firm up properly.
- Clean Straws: Rinse the straws immediately after use to prevent the gelatin from sticking and hardening inside.
- Experiment with Colors and Flavors: Feel free to mix different flavored Jellos for a colorful assortment of worms.
Easy Variations
- Layered Worms: Use different flavors of Jello in layers to create colorful, striped worms.
- Gummy Worm Effect: Mix in gummy candies with the Jello before it sets for a fun surprise.
- Fruit Juice Variation: For a healthier alternative, use fruit juice instead of Jello, adding extra sweetness with honey or agave syrup if needed.
- Spooky Add-Ins: Add edible glitter or confetti to give the worms a sparkling effect.
- Worm Cups: Instead of straws, set the Jello mixture in small cups and insert gummy worms for a quirky dessert.
What to Serve with Jello Worms
- Chocolate Pudding: The creamy texture and rich flavor make a delicious contrast to the wiggly worms.
- Cupcakes: Decorate cupcakes with Jello worms for an eye-catching dessert spread.
- Ice Cream: Serve them over vanilla or chocolate ice cream for a fun mix of textures.
- Crushed Oreo Dirt Cups: Pair with crushed Oreos to create a “dirt” dessert.
- Fruit Salad: Balance the sweetness of the Jello with a fresh fruit salad for a refreshing side option.
Storage and Reheating
- Refrigerator: Store leftover Jello worms in an airtight container in the refrigerator for up to 3 days.
- Freezer: Freezing is not recommended as it will affect the texture of the worms.
- Best Method: For optimal texture, serve chilled directly from the fridge. If they start to soften, refrigerate them again.
- Meal Prep Note: These worms can be made a day in advance for parties or gatherings.
Common Mistakes to Avoid
- Not Fully Dissolving the Gelatin: Ensure all gelatin is fully dissolved for a smooth texture.
- Overfilling the Straws: Don’t overfill, or it’ll be difficult to remove the worms. Aim for a slight gap at the top.
- Improper Cooling: Allow the mixture to cool slightly before filling to avoid hot water accidents.
Jello Worms: Background & Cultural Inspiration
Jello Worms are a playful take on traditional gelatin desserts, often associated with Halloween or kids’ parties. The concept originated from the classic "gummy worms" dessert idea, where creativity meets nostalgia, turning a simple treat into a whimsical display. They symbolize fun and creativity in the kitchen, encouraging young chefs to experiment with their food. This vibrant dish often brings back fond childhood memories for many, making it a beloved favorite that traverses generations.
Frequently Asked Questions
Can I use flavored gelatin instead of Jello?
Yes, any brand of flavored gelatin works well as a substitute for Jello. Just follow the package instructions for preparation.
How long do Jello Worms last in the refrigerator?
They can be stored in an airtight container for up to 3 days.
Can I make these worms in advance?
Absolutely! These worms can be made a day in advance, making them perfect for events.
What if my Jello worms won’t come out of the straws?
Try running hot water over the outside of the straw for a few seconds to loosen the gelatin.
Are there any alternatives to using straws?
You can use small cupcake liners or molds to shape the Jello if you don’t have straws on hand.
Final Thoughts
Making Jello Worms is not only a delightful activity but also results in a fun dessert that can bring a smile to anyone’s face. This simple recipe is perfect for various occasions, offering a playful twist on traditional treats. With just a few ingredients and some creativity, you can create a dish that’s both tasty and visually captivating. Give this recipe a try, and enjoy the wiggly, deliciously sweet fun of Jello Worms at your next gathering!
PrintJello Worms
A fun and wiggly dessert that’s perfect for parties and kids, Jello Worms are easy to make and visually entertaining.
- Prep Time: 30 minutes
- Cook Time: 0 minutes
- Total Time: 270 minutes
- Yield: 4-6 servings
- Category: Dessert
- Method: No-Bake
- Cuisine: American
- Diet: Vegetarian
Ingredients
- 1 package of Jello (any flavor)
- 1 package of unflavored gelatin
- 2 cups of water
- Flexible straws (not paper)
- Cooking spray (optional)
Instructions
- Prepare the Mixture: In a medium saucepan, bring 1 cup of water to a boil. Remove from heat and add the Jello and unflavored gelatin. Stir until fully dissolved.
- Add Cold Water: Add the remaining 1 cup of cold water to the mixture. Mix well.
- Fill the Straws: Using a funnel, carefully fill each straw with the Jello mixture. Hold the straws upright and fill them completely.
- Chill: Place the filled straws upright in a glass or cup, and refrigerate for at least 4 hours or until fully set.
- Remove the Worms: Once set, gently squeeze the straw from the bottom while pushing the Jello worm out from the top. Use a knife to help loosen if necessary.
- Display: Arrange the worms on a platter or inside a cup of dirt (crushed Oreos) for a fun presentation.
Notes
For best results, let the worms set overnight. Use thinner straws for more realistic shapes.